Thursday, April 10, 2014

DIY Brightest Collapsible Kayak Light

I have never been satisfied with the brightness of off the shelf lights and my DIY light. I have had a few to close to call encounters due to the going to the light! Here is what you need.
Items needed to build this light were:

  • Tektite Mark III 4 LED light $24.99
  • (1) section of 3/4" thin wall PVC 12" long
  • (2) sections of 1/2" sch 40 PVC 12" long
  • (2) 1/2 slip couplers
  • (1) 3/4 slip coupler
  • (1) 3/4 to 1/2 adapter
  • (1) 1/2 end cap
  • 3-4 feet of Bungee cord
  • (1) SS bolt and nut
  • Drill and bit slightly larger than the bungee
Step  1 put the Teklite light in the 3/4 PVC pipe. The bungee that comes on the light is pulled out the end using a piece of cord or what ever you prefer. Slip the bolt through a hole drilled in the bottom of the PVC and through the bungee to hold it in the PVC tight. The light twist at the top to turn on and change the batteries so you will never have to pull it out technically,

Step 2 Attach the end of the long bungee cord to the bolt,
Step 3 using a 3/4" coupler and a 3/4 to 1/2 adapter slip that on the bungee,
Step 4 slip a section of the 1/2 PVC on the bungee
Step 5 add 1/2" coupler and another section of 1/2 PVC
Step 6 drill a hole through the side or out the end cap and thread the bungee through,
Step 7 assemble the sections together and pull the bungee tight and tie a knot in the end. 

This light is extremely bright. The photo was taken at 45 feet away. You can change this anyway you like as far as lengths etc. Its a great light for under $30. 


Sunday, March 9, 2014

2013 Hobie Pro Angler (PA) Lowrance Elite 5 Depth Finder Install

At the end of 2013 I retired the Jackson Cuda and bought a 2013 Hobie Pro Angler. What sold me on the Pro Angler? The Seat! After riding in comfort for two years in the Jackson Cuda but wanting the range and ability to fish on the move I chose the Hobie PA with the Vantage seating. I guess if you are reading this you just want to get to the nuts and bolts of the install. I have skipped the transducer install since Hobie has a Youtube video covering that and it is that easy.
Supply List:
Waterproof storage box size large from the Walmart camping department
(2) 2 wire connecting harnesses
Fuse Holder
Small rubber grommet for a 1/4" hole
Ram 101-L011 Mount
YakAttack Screwball 1.5 inch
YakAttack Geartracks 12-16" depends on your needs.
Lowrance Elite 4 or Elite 5 (Note: You can cut back on the RAM and Screwball to a 1 inch on a 4)
UB 1270 or UB 1280 12V battery. The more amps the longer it last. 15 hours is no problem.

Tools:
Drill
1/4" drill bit
Wire strippers
2 female slip on terminals
Butt connector
Heat Shrink
Lighter
Wire Crimps

Step 1 Transducer Install- mount the transducer in the pocket on the bottom. Just unscrew the 3 screws and mount the transducer. I did have to get a 1/2 longer stainless bolt than Lowrance supplied to use the mount. Route the wires through the holes on your PA and direct it to which ever side you prefer your unit to be on. I routed mine on the starboard side as can be seen.

Step 2 Mounting the Battery- Prepare your box by drilling a hole in one end and inserting a rubber grommet to help keep water out. Cut one of your 2 wire harnesses in half. Run the wires through the grommet and install one female clip to the white wire that will serve as your negative and will slide on your battery terminal. On the red wire use a butt connector and join it to the fuse holder using heat shrink to cover the connection. Use a female terminal on the other end of the fuse holder. This is your positive wire. I went to my local Lowe's and found a clamp that was a plastic conduit clamp that was made to screw to a flat surface. I mounted with bolts to my waterproof box and clamped around the Hobie mast post.


 Okay the battery box is mounted and the transducer is run. Add the other half of your two wire harness to the power cord on your transducer harness. Just match red to red and white to black. Again use butt connectors and heat shrink.

Step #3 was to mount he unit on the side board. I decided I wanted the unit on my right side to this is where my wiring harness was fed out.


I mounted (2) Yakattack 12" Geartrac's on the mounting boards. These are very functional with all the items available from Yakattack and Ram to mount. I have now have the ability to move my unit forward or back or switch over to the left side with no additional drilling. I can also mount additional rod holders with the Scotty track adapters. Yakattack provides all the mounting hardware all the way down to the drill bit.


Once both sides were mounted it was time to get the unit on. This was easy. Using a 1 1/2" Yakattack Screwball on the track and the Ram 101-L011 Mount minus the base just assemble.


Here is the final view. It works great. I have seen that I need to charge the battery more often since this unit is much larger than the Garmin Echo 100 I used on the Jackson Cuda. This is easy as you can see with the charger below. I just added another two wire adapter and it is charged inside the case on the PA. 


Friday, December 27, 2013

NCKFA Spots and Specks Tournament

In November each year there is a gathering of kayak anglers at Fort Fisher boat ramp located at the end of Hwy 421 near Wilmington, NC. This was my first year at this event the NCKFA spots and specks tournament. The goal is the longest combined length of a Speckled trout and Red Drum. We paddled out at the start time of 8am. I paddled to my first location and joined several others. I put out some mud minnows on Carolina rigs and started throwing a Zman PaddleZ. It did not take long to connect with a 17 inch trout. I switched to a Mirrolure MR17 and the bit got better but I lost a similar sized trout at the kayak. The trout bite slowed as the tide came in and with no luck on the live bait off I went in search of a drum. I started along the rock wall joining about a dozen other anglers with no success. Once I had another angler drift within feet of my kayak and little concern for me it was time to go. I do not like fishing the crowds. I worked my way around the basin fishing live baits and multiple artificial offerings. I decided to prospect with a jig and a big-bite baits curly tail grub in baby speckled trout color. Paddle, stop, cast, paddle, stop, cast then BAM. Fish On. I knew with the way he was fighting and dragging the kayak around I had a good red on. My thought was how many times has this happened and I lost the winning fish. After some tug of war the red found his way in the EGO net. I put the Hawg Trough ruler on him to make sure he was a slot fish and paddled to the ramp to get a good picture. Final measurement was 25.5 inches long. I knew I had two solid fish for a total of 42.5 inches. After it was all said and done I ended up with big fish for the drum and 2nd overall. Another angler had a 22 inch drum and 21.25 inch trout for a 43.25 total. Lost by 3/4 of an inch. Either way Astral came through with a Romney PFD and Brewer shoes. KC kayaks stepped up with with a great kayak for the winner. If you have not paddled one of their kayaks don't be fooled by their looks. They are fairly quick and very stable. Perfect for stalking reds in the shallows of Fort Fisher and Buzzard Bay.  This was my last tournament in the Jackson Cuda. It has been a great kayak and I may purchase another in the future. I wanted to make a change in the type of kayak I fish. Keep watching as I rig my new kayak over the Winter 2013/2014. As always I am honest in my thoughts and am not endorsed by any manufacturer. I buy or build everything that I use.

Monday, September 9, 2013

Old Drum of NC!

Neuse River Old Drum

Labor Day weekend I took a shot and picked up some fresh mullet. I drove for two hours to locate a launch site that I had only seen on Google maps. Lucky for me it was open. The Jackson Cuda was loaded for action. Two Shimano Trevala rods loaded with Penn Battle 5000's. As I paddled out onto the shoal every boat around was looking at me like, "where did this guy come from?". I got setup on the shoal where there were large groups of shad (aka menhaden) were working the area. With two rods out it did not take long for the pinfish to find my baits. I spent the next two hours baiting back and forth. As the sun started to fall I knew it was not my day to hook into one of these big boys and being out here on a kayak after dark was not a safe bet with so many weekend boaters on the water. We cannot always have a productive trip and some will only tell you about the good trips. I proved one thing to myself, that I could paddle to the shoal and fish for these just like I do when I have my boat. Till next time stay safe. The next report should be from the NCKFA Oak Island Classic. Come and join me there. 


Sunday, August 4, 2013

2013 TJM Kayak fishing tournament

The 2013 TJM kayak fishing tournament was excellent as always. Hook, Line and Paddle in Wilmington, NC puts on this great event and is the main sponsor. I was having a difficult time deciding where to fish. Two weeks earlier I had fished Fort Fisher at crossover #4 down the beach with a small flounder and a 17" redfish to show for it. Since we were suppose to have a dead low tide at 5:30am and we could not launch till 6am I made. Last minute decision to launch at the Fort Fisher basin. I was greated by about 40 kayaks when I arrived. We launched at 6 am and I went to catch bait. I knew once the tide came up it would be hard to locate and catch bait. I filled my tank and off I went trolling a Billy Bay Halo shad. This was new water for me so I scouted around and found a nice point that had everything I was looking. It had bait, water flow, oyster rocks, and a grassy point. I setup shop with three lines and started catching redfish. With several reds landed and released up to 21 3/4" I was on the board. I was checking baits and in comes a 12 1/2" flounder that just ate the bait and settled back in. This is typical with flounder to eat the bait and the hook. Now all I needed was a trout for the slam. I boated a 13" trout and as I get the camera he hops over the side. I am hurt but not discouraged. I say a nice little prayer to The Lord. Nice bait goes off and it is a heavy trout. I get him on the board and he is 18 3/4". I know I have a contender since last years winning trout was only 16".  I keep fishing and after a few more smaller trout and reds I head in the the ramp and check in. I see that there is a 19" trout and it ended up holding up and edging me out for 1st. Well 2nd isn't bad out of 75 anglers and 53" total for 3 fish. Looks like my slam would have put me in the 4th or 5th spot since 3rd was 55". It was a great turnout for a great cause. Come join us next year. Till next time.

Monday, April 1, 2013

Spring Trout and Stripers

I know It has been quiet around here but its hard to stop fishing and start typing. Spring is here in Eastern NC and with that the speckled trout start leaving the backs of the creeks to make their way to open water. This is the time to catch your citation trout. You will find them from the mouth of the creeks to the backs. I suggest starting at the mouth with a probing bait like Berkley Gulp or a DOA shrimp on a rattling cork. Once you locate some trout you can keep after them with shrimp but the big trout put on calories with mullet and mud minnows. I move over to Mirrolure CMR-17 in white or Purple. These colors just came out this past Fall and have been on fire all winter. I have started moving all my reels over to Fin's Fishing Windtamer Braid. After fighting wind knots with all the other braids and some mono lines, Fin's Windtamer is the real deal. There is not a better braid on the market that I have used. Just so you know I am a Amatur Staffer for all these lines and baits. That means I walk in the store and lay down my hard earned money just like you. I have never received an endorsement or sponsorship from any of these manufactures. I use what I believe in not what is free!
Speaking of Spring the Striped Bass AKA Rock have been biting good as of March 30th, 2013. We got out on the Tar River in Greenville after a Easter Egg hunt in pursuit. It did not take long to start connecting on some Rapala X-Raps. Most ranged between 16 and 19 inches and all were released to fight another day. They did not seem real picky on the color as long as I was holding the rod. There is never a bad day on the river unless you are broke down or without a paddle.

Monday, November 26, 2012

Speckled Trout Bite is on fire!

Well as you can imagine its my time of year when the trout are stacked up and as I stated earlier in the year this is the best season in years. I have not fished a creek, sound or ocean that I have not found trout. The hot bit has been Mirrolures for me since that is mostly what I throw. I have been having luck with the new CMR17 in a Purple color along with the traditional MR 17's in every color I have thrown. The MR27 is producing some but the MR17's are producing more fish. I did catch a nice 20" fish weighing 2 lb 8 oz in early November on an MR19 in the 808 color.
Everyone seems to be picking up drum mixed with the trout bite on the same baits.
Lately the hot bite has been the easiest to get to in Atlantic Beach, NC at the public access near the Oceana pier. I stopped by Saturday at dusk and there must have been 50 people surf fishing for the Specks. There was a 7 lb trout reported caught from there on 11/23/12 according to the Chasing Tails Bait shop website. Live shrimp, live minnows and Mirrolures are all catching trout. If you toss jigs you will add some drum to your bag. If you fish the creeks stay in the backs since that is where the trout seem to be concentrated. I am catching a few in the river but they are larger back in the creeks. Good luck. This is my 5 year old with his first Mirrolure trout. He caught several this summer on jibs but I am most proud of this one!

Sunday, October 14, 2012

NCKFA Oak Island Classic

Not a lot I can really say except this is a great event put on by some great people for a great cause. I got to Oak Island on Friday around noon and launched in an attempt to pre-fish and learn the local water. I went to a local creek and with a falling tide saw lots of exposed oyster beds. Caught 2 small redfish but nothing that would win a prize. So on Saturday the morning of the event arrives. I am the first kayak fisherman and the launch and then the official arrives. After I get setup and the official blows the whistle off we go. The wind is blowing 15-20 NNE. I hit a marsh bank with top water with about 3 cast. I get to a nice little point that everyone passed by and on the first cast a 16.5" Speck is locked on. I get back to the point, set anchor and take my photos. I continue throwing and catch 5 more speckle trout, which seemed odd since everyone stated there were none around they could locate. I figure I need to try for a slam and start jigging Gulp. Sure enough two small redfish around 14 inches. I wrap it up around 12 and head for some structure to try for the flounder. No luck. Once at checkout the trout sounds promising and I get the call to view my photos. Its confirmed and a nice trophy and some prizes for a 3rd place trout out of 168 anglers. Looking back I guess I should have packed up after that first fish. Not really I loved catching those specks that were stacked up. Thanks to the other anglers that passed them by!

Installing a Garmin Depth Finder on a Jackson Cuda Kayak

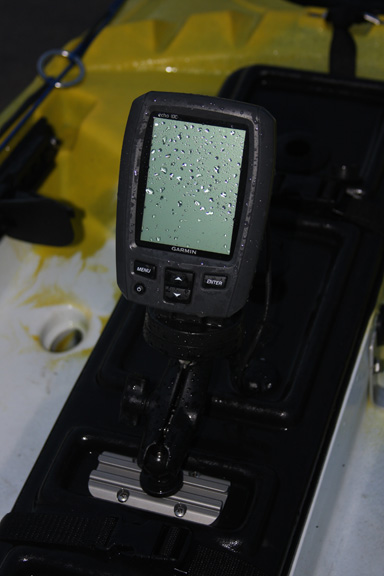
I wanted to have the ability to find depth contours when fishing deeper water for Old drum and if I ever do so freshwater lakes. So I bought a Garmin Echo 100 from West Marine for $69.95 after the did a price match from my phone. After I got it home I studied how to install it with the different arms and the Lowrance scupper mount and decided to just build my own. I grabbed a piece of 1" aluminum flat bar from Lowe's and with a few quick measurements started to bend and shape it. Once I got the right lengths I smoothed the edges with a file, drilled the hole for the bolt and another for the transducer bolt. Then I attached the transducer.
Next with a little bending I was able to get it through the front scupper hole on the right side of my Jackson Cuda to keep it out of my way and still have use of the scupper.
I routed the wire into the center hatch using a West Marine wire cap item 8717886. It was time to mount the unit. I wanted to be able to remove the unit when it was not needed so a 4" Yakattack Geartrac was added to the first slot on the hatch cover. A Yakattack screwball was added and a Ram Mount arm and mount were used.
Another West Marine wire cap was used to run the power and transducer cables from the hatch to the unit.
Next was the power. I orders a 12 volt 8 amp gel battery and installed it into a Ozark waterproof container from Walmart. A grommet was used an a disconnect to be able to remove the box so the battery can be charged.I tied a bungee cord between the scupper holes to hold it out of the way. Make sure to fuse it. I switched to a mini AVP type fuse.
I hope this has helped you see how I installed a depth finder onto my Jackson Cuda kayak.


Saturday, September 15, 2012

Boomerang Tool Company "The Snip"

Let me start by saying I purchase every product I discuss and no manufacturer has sent me any items to endorce. I am telling you what I like and what I don't like up fron and honest. With that out of the way I recently orders a product called "The Snip" by Boomerang Tool Company. They offered a code on Facebook and I could not resist. I received "The Snip" a few days later which is impressive since it came from CA. I attached it to my life vest since I have it with me on the boat and kayak. It has a retractable line and you can lock the cutter so it doesn't snip by accident. I have always used a knife to cut braid since I have never found a product that would cut it easy. Those days are over thanks to Boomerang's "The Snip." This think slices through braid and mono like no ones business. They have added a client for life and I will be checking out there other products in the near future. I have only had them out for one trip so lets see how they last through the Winter and trout season.

Monday, August 27, 2012

Jackson Cuda Kayak Review

You may say this review comes a little late. I did not want to post a review until I put the Jackson Kayaks Cuda through a full test. First the likes: Jackson has the #1 sit on top seat in the world. The cool mesh, comfort and ability to go from the low paddle position to the high fishing position to moving it to the back so you can stand and fish makes it amazing. Even though the Native Ultimate and now the Native Slayer are close, Jackson Kayak nailed it. It looks like Hobie has taken notes and has incorperated the same style seats into the 2012 Hobie Pro Angler 12 and now the 2013 Pro Anger 12 and 14. Its a complement when the competition sees a winner and copies you. The number one complaint of kayak angers has been the seat is uncomfortable and wet. The solution is the Jackson Cuda and Jackson Coosa seats. Next fisherman want a kayak they can stand in to cast, sit fish and fly fish from. Again Jackson answered with the Coosa and the Cuda. Where does the Cuda pull away it is 30 inches wide and 14 feet long. Which gives it a great speed and stability ratio. This kayak gets going and you are almost making a wake as you paddle. Other items seem like a great idea on the surface but turn out to be impractical. The rod storage and tip protector only is useful when I am transporting the kayak on the truck. On the water the only thing I store in the rod keepers are the Yakattack Park and Pole and the Bending Branches Angler Ace paddle when not in use. The problem with placing rods here while paddling is they tend to get in the way and if you flip the reels outboard they get soaked (with saltwater in my case). Jackson has helped in 2013 on the rear rod holders with using Scotty tubes to get the reels away from the water. The center hatch is nice and a place I store alot of gear using the Jackson hatch insert. The fact that the Jackson Cuda has hatches in the front, middle and rear make it very easy from a rigging standpoint. I can access the inside of my entire Cuda from the front to the back for rigging like my Cuda anchor trolly install. These kayaks are proudly made in Tennessee, USA. Please support made in the USA no matter what you chose but do yourself a favor and paddle a Jackson before you buy a competitor.

Columbia Drainmaker Shoes Review

During a recent fishing outing in Morehead City, NC I was attempting to collect some bait and sliced my foot on some oyster shells. This was not the fist time so I felt I needed a show that not only offered full coverage of my foot but also ties so it would stay on my feet when I get in the sticky mud of the Carolina marshes. The solution was the Columbia Drainmaker shoes. I purchased them from the Columbia store . They were comfortable and were true to size. The test was to come during the Hook Line and Paddle TJM tournament. I stepped into the water unloading the kayak into the Fort Fisher marshed and they drained and wore like any normal shoe. I fished and wore them from 3am-9pm with no issues. All it takes to clean them is a water hose. I thought the mud and stained water would discolor them yet the whites have stayed bright.
If you have been looking for that watershoe that has it all consider the Columbia Drainmaker. For me it is worth the price and hopefully will save you a trip to the hospital getting oyster shell stitches.

Sunday, August 12, 2012

DIY GoPro Kayak Mount

I must be the cheapest of the cheap and not willing to buy a camera pole for my GoPro and wanting to stay simple I took a 1/2" plumbing screw cap and added a 1/4" stainless bolt. This bolt goes right into the GoPro tripod mount ($7.99 retail). This screw cap is interchangeable with my DIY kayak light in a earlier post on my pole. The swivel mount is optional but allows for other angles.

DIY Kayak Baitwell Livewell

I wanted to get my livewell completed before the TJM Tournament at Hook, Line and Paddle in Wilmington but I did not have all the parts so I used a Flo-troll bucket. Don't get me wrong the Flo-troll served its purpose but putting the bucket in and out of the water to keep the bail alive was a chore and not my primary concern which should have been catching fish. The DIY baitwell is a solid solution with the only possible drawback that the pump could create some noise the fish might not like. I figured it was worth a shot. I purchased a 40 lb Gamma Vittle Vault at my local super pet supply store. I did see there is a similar model available online is 60 lbs which would add some capacity as a livewell but it would be too much weight in the back of your kayak..
First I drilled my holes for the inlet and outlet. I used a spray head that could be adjusted to turn the flow up or down. This hole was 1 inch. Next was the outlet with is standard at any marine store. This one is 1 1/2 inches and my though was I did not want the water backing up in the tank or tank well since my Jackson Cuda doesn't have scuppers in the tank well.
If your does you can run your intake through a scupper hole. You may want to consider adding a screen over the outlet to keep from losing baits but I have noticed I rarely loose baits.
Next I needed a way to carry this thing if I had to catch bait away from the kayak and why empty your cast net into your tank well and get it nasty. Just set it on the sandbar and load it there with bait. After you have it loaded haul it to you kayak and wash off the bottom before setting it in. Ask you can see I used a kayak handle available at Hook 1.
Why are lids so easy to lose? Even if they do float why deal with it so I attached it with a screw in the lid and some bungee to one of the nuts holding the handle on. problem solved.
Next was adding a waterproof box to house my battery and switch to turn on my pump. As you can see I just attached it with (4) 10-32 x 3/4 stainless steel machine screws, #10 SS washers and some SS lock nuts. The battery will be a 12volt gel cell battery and I will put some cutoff pool noodle on each side to keep it from shifting.
I have added a 2 wire disconnect on the pump wire so if I decide to use this as dry storage I can simply take off my hoses. As you can see the wire run is as follows. Positive to the switch. Positive from the pump to the other switch. The negative goes straight from the pump to the battery. For a pump use a Rule 360 model 24. The 500 pictured was great but draws so many amps the battery would be dead after 6 hours. I also will switch it on and off to conserve the battery but be careful as the water will drain back out the pump hose and leave your bait will very little water.
I have also added a rod holders from Hook 1 on each corner for rod storage so no Milk crate is needed. The semi-finished product. I need to get a rubber grommet to run the wires into the box and I will be attaching some pad eyes so bungee this to the Jackson Cuda tank well. I have the openning facing toward me so I can simply reach behind me an net some baits. It is quite and easy.